Is your website getting slower with every passing day?
Since the eCommerce industry’s evolution, the importance of content has grown exponentially. And, evidently, the content isn’t plain text anymore.
Undoubtedly, dynamic content types and media files attract the attention of site visitors. However, they also increase the load time and average page sizes of websites.
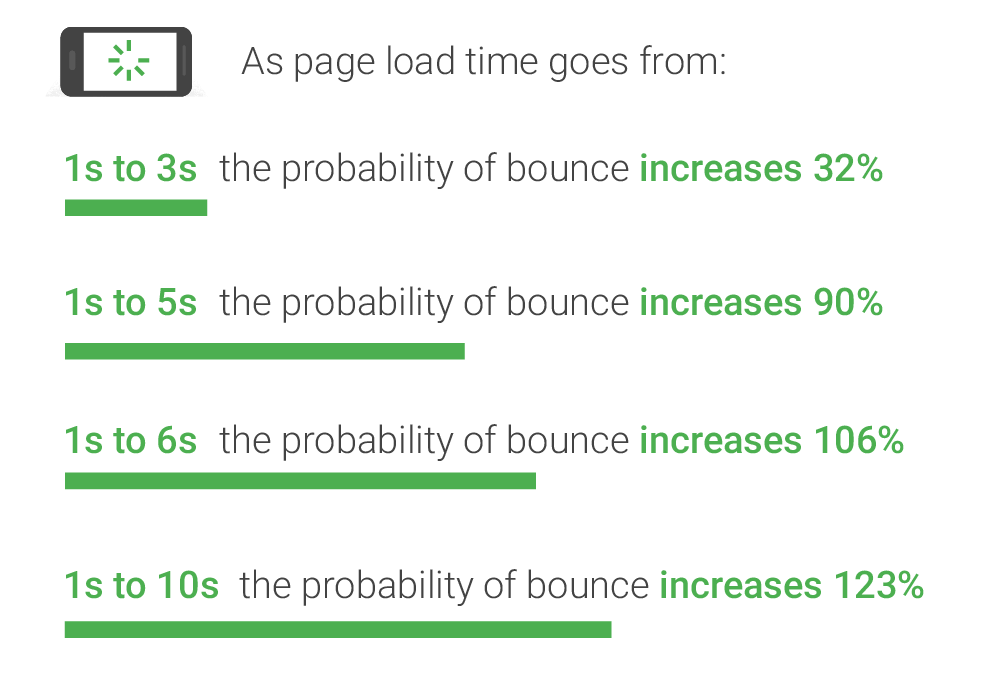
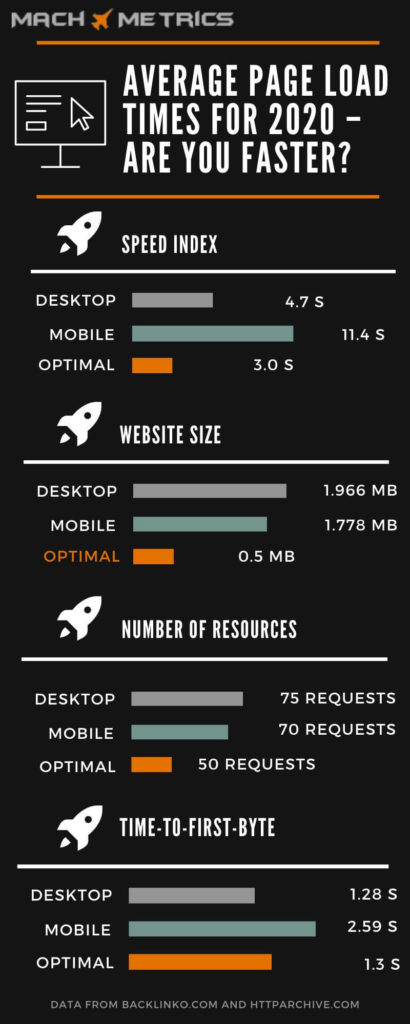
A heavy website or slow loading time not only frustrates your visitor but also pushes them to leave your website and switch to another website. Data from the study conducted by ThinkWithGoogle also shows that an increase in page load time also increases the bounce rate of the website in a very accurate proportion.
The study was conducted by HttpArchive.org claims the average size of a website to be 1.778 Mb for mobiles and 1.966 Mb for desktops while Google’s standard recommendation is to be below 0.5 Mb.
The slower websites add to a less satisfying user experience. And believe me, Google doesn’t prefer it at all. This is where a WordPress CDN (Content Delivery Network) service comes into the picture.
Table Of Content
- What Is CDN?
- How Does A WordPress CDN Work?
- Benefits Of Having A WordPress CDN
- How To Choose The Best CDN For Your Website?
- Why Does The “PULL” & “PUSH” Zone Need Consideration While Selecting A CDN?
- Implement CDN on Your WordPress Website in Just 3 Steps!
- An Example Case: Implementing WordPress CDN With Amazon CloudFront
- Popular CDN Providers in the Market
- Summing Up!
What Is CDN?
A CDN or a Content Delivery Network is an incredibly smart and simple way to fuel up a WordPress website. A CDN is a server setup that enhances the load speed of web pages by optimizing the delivery requests of the media files.
Even the most optimized sites face latency when their visitors are far from the server location. The same latency is also experienced by the site visitors when too many requests are pinged together on the server and the webpage takes a while to load.
This latency was the major reason behind the development of CDN concepts. A CDN stores the copy of the web pages in cache format and delivers it to the end-user upon every relative request from the nearest server.
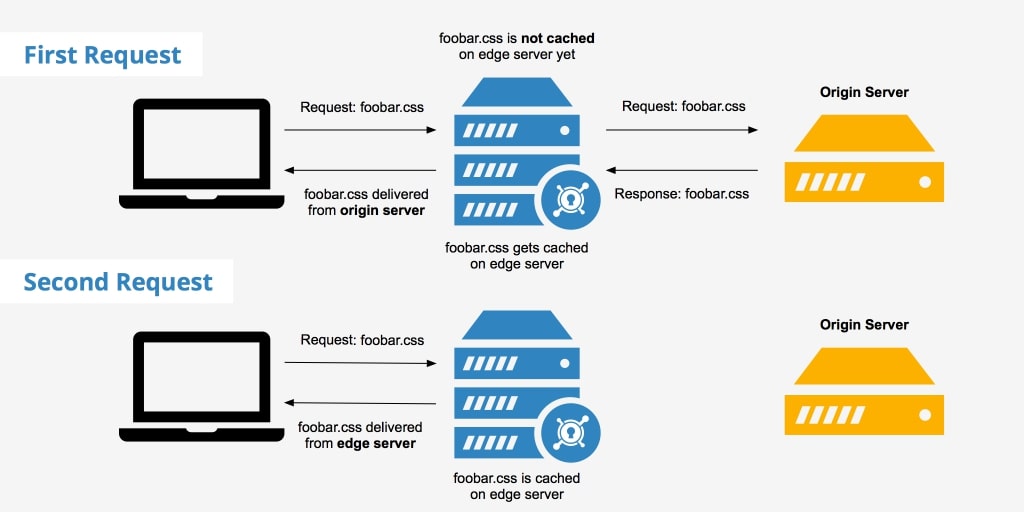
Source: KeyCDN
KeyCDN, in the above image, carefully explains the process of caching the requested CSS file from the origin server and delivering it to the end-user on subsequent requests.
CDN or content delivery network server setup is a great and reliable solution to optimize your website and improve the user experience globally.
How Does A WordPress CDN Work?
As we’ve read so far, a CDN creates a server setup to avoid latency and enhance the user experience. But what is this latency?
When a website is hosted, its server has only one physical location. The users near the server location experience a great loading speed. While the users far away from the server experience degraded loading speed.
The concept is very much similar to the wifi setup from your home and/or office. When you’re closer to the wifi router, you might experience a strong signal strength. However, the same signal strength weakens when you move far from the dedicated network space.
Take a website hosted in India, for example (refer to the image for better understanding). People accessing the website from India will witness a better loading speed than that visitors from the U.K. or the U.S.
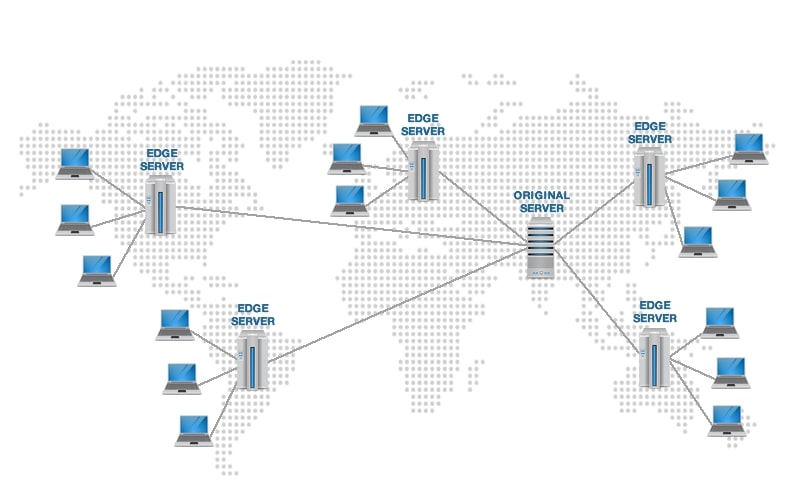
However, when the CDN is added, a copy of all the web pages is made at various server locations across the globe. Hence, now when the user from the U.S. or U.K. will request a page from the same website, they’ll observe a faster load time. Because now their requested pages are delivered to them from their nearest server locations.
To ensure efficiency in delivering the requests faster, CDN uses its PoPs (points of presence) from multiple locations. Each of the PoPs contains multiple servers with defined parameters. Further, when the request is received from the end-user, the concerned PoPs server from within the parameters is responsible to deliver the requested files.
Benefits Of Having A WordPress CDN
A WordPress CDN (Content Delivery Network) significantly improves the loading speed of your website making your user experience better. It, however, is not limited to only making your user experience smooth. Rather, a WordPress CDN also offers the following benefits –
1. Makes Your Website More Crash-Resistant
A CDN network setup simply refers to the cluster of geolocated servers. These servers ensure the smooth delivery of requests from the user-ends. In case any of the servers fails or crashes, the request will be delivered from the next server in the zone. Anyhow, the chances of the website crashing are minimized to the least.
2. Better User Experience
The spread of geolocated servers around the world ensures an instant connection with the server. Hence, the requests made by the end-users are delivered faster with better page load speed and less or no strain to the origin server.
3. Improves SEO Ranking
Google is very peculiar in providing the best user experiences. Hence, page load speed is also a major factor affecting the website’s ranking. With a WordPress, CDN implemented, not only the website’s speed improve, but the website will also move ahead in the search engine results. Therefore, improved SEO rankings in the SERP.
4. Reduces Bandwidth Usage
When any website is hosted, dedicated bandwidth is allotted to them. Bandwidth is the amount of data that the website is authorized to transfer to the end-user in a given period.
Earlier, when the concept of CDN wasn’t in terms, website owners used to increase the bandwidth of their hosting servers to expand their business’s reach. It eventually resulted in higher costs and expenses as well. But, with CDN, the cluster of servers are there to deliver the requests received. Hence, there is no more requirement to increase the bandwidth for the origin server.
5. Faster Requests Delivery With Caching
A CDN creates a copy of the files from the origin server and saves it on all its servers. When these files are requested by the user twice, the CDN creates a cache for the concerned files. This method is very much similar to WordPress caching.
6. GZIP Compression
GZIP compression is a process to compress or decompress files to GZIP file format. In WordPress CDN, GZIP compression is applied on the server-side or the PoP to further reduce the sizes of the files stored on the server like HTML, javascript, CSS snippets, etc.
How To Choose The Best CDN For Your Website?
With the growing market demands, there are a lot of WordPress CDN providers. And you might not know which CDN provider to choose and why it will be the “Right Choice” for your business type. Majorly, two factors are most referred to when choosing the right CDN for your WordPress website. They are –
1. Functionality
Functionality is most important to consider for at least you must know what all you’ll be achieving from it. Although GZIP compression and origin-pull are the basic functionality of almost every content delivery network provider, you must look for more custom features like CNAME for secured websites.
What Is CNAME?
CNAME is the abbreviation for Canonical Name. CNAME records are used to alias one name to another.
Click Here to learn more about CNAME records.
The functionality of the CDN provider also includes access to data and usage statistics of uploading the files, overriding the caching browser, doing a Purge-All via API, server power, and knowing exactly how fast the server would work at the peak traffic hours.
To measure the speed of the server, 2 KPIs play a critical role. They are –
- Latency (measured in ms)
- Throughput (measured in kbps)
2. Expenses
A business is always about planned expenditure and budgeting. Not all requirements are the same. CDN providers are also aware of it. Therefore, custom WordPress CDN packages are the most optimum solution offered by CDN vendors. And it is the most definite recommendation from our side as well to go with the custom package and pay ONLY for the service that you need.
Why Does The “PULL” & “PUSH” Zone Need Consideration While Selecting A CDN?
Functionality and expenses are the two major factors considered while deciding to select WordPress CDN. Furthermore, I would also suggest you consider the “Push” and “Pull” zone support while choosing the WordPress CDN.

Source: cdn.net
In a “Pull Zone”, a WordPress CDN is used as a mirror server to the origin server. Hence, all the files and static content are copied from the origin server and stored on the CDN servers. This process is termed the pull zone because files are pulled from the origin server and then stored in the CDN servers.
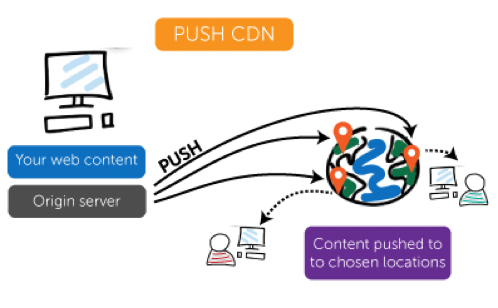
Source: cdn.net
On the other hand, a “Push Zone” is a case when all the content and files are directly uploaded to the CDN server rather than uploading them onto the origin server and redirecting them further.
To learn more about the “Push” & “Pull” Zone, Read Here.
Phew! That was quite a lot of information to gulp down in one go.
Moving on to the next section, we’ll be discussing “how to implement a WordPress CDN?” followed by an example case showcasing the implementation of Amazon AWS CDN service and some top CDN providers across the globe.
Implement CDN On Your WordPress Website In Just 3 Steps!
Installing a WordPress CDN is a comparatively easy process. All you need is a suited CDN provider and administrative access to the website in question.
Step 1. Select a CDN Provider
Well, this is the first and very basic step. There are two approaches to accomplish this step.
- Choose a web hosting service with integrated CDN like WP Engine. Selecting the web hosting service with integrated CDN makes it easier for you to configure the settings as all you need to do is update your account settings.
- The second approach is to get a third-party WordPress CDN provider. In this case, you might take a little longer to first choose the CDN provider then configure the settings and complete the integration process manually.
Step 2. Equip Your WordPress Website
A WordPress website provides an easy integration environment for most of the CDN services available in the marketplace to manually set up the WordPress CDN. However, you can also do it via plugins like WP Super Cache and/or W3 Total Cache.
Both of these plugins significantly speed up the website performance by caching the static HTML files. Moreover, they integrate with the CDN thereafter serving the required website files from it directly instead of the origin domain server. W3 Total Cache plugin however includes more precise options and benefits to tweak your solution as and when required.
When done with selecting the plugin, install and activate it to start with the last and final step to connect the WordPress website with the configured CDN.
Step 3. Connect Your WordPress Website With Configured CDN
To proceed with this step, you must first check all the relative settings with the chosen CDN and WordPress plugin so far to be completed. Then you must go along the following –
- Check for the activation steps with your CDN provider
- Sync all the files correctly
- Set up your WordPress website to call the CDN for file requests instead of the origin server
(This step deals with adding the URL provided by the CDN to the Off-Site URL text of the third-party plugin you may have used earlier to prepare your WordPress website for CDN).
An Example Case: Implementing WordPress CDN With Amazon CloudFront
You may still have confusion and doubts about implementing the WordPress CDN to your website. Hopefully, this example will help you to clear your confusion and doubts a little further.
We’ll implement a CDN service provided by the Amazon AWS Services here for a WordPress website. (The process may differ depending on the CDN service provider you choose. However, there isn’t much difference though).
Starting with the process…
1. Configuring Amazon CloudFront
a) If you already have an account with Amazon AWS Services, you may log in and proceed with step 2. If you’re new to Amazon AWS Services, You’ll first need to Sign up and register to create an account.
- Go to aws.amazon.com> Create an AWS Account.
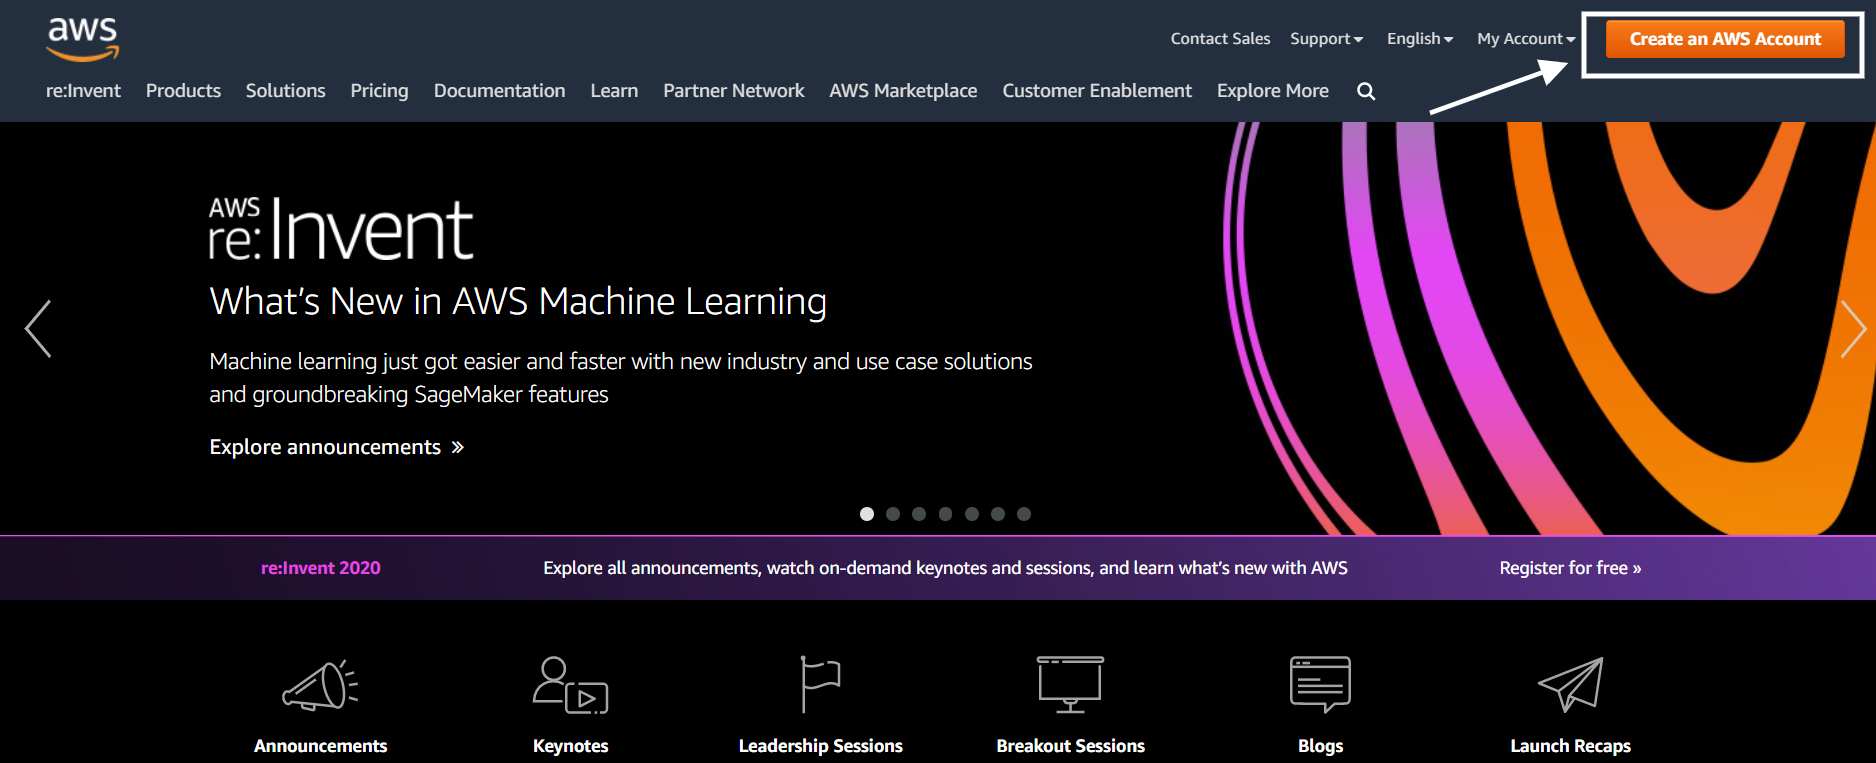
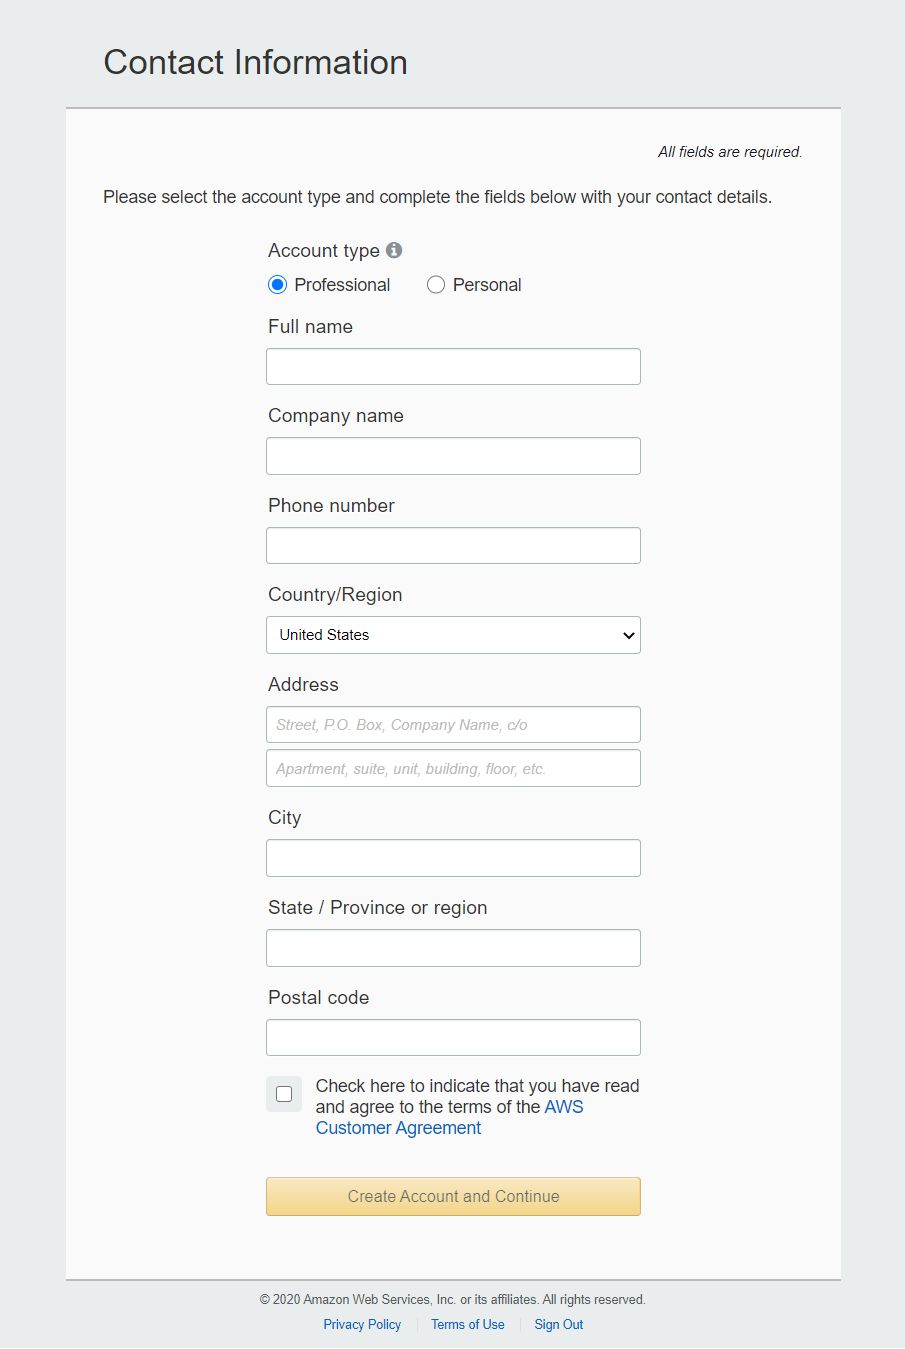
- Complete the form field to proceed further with the signup process. You’ll need to enter your credit card details at the billing information for future purchases that you might make while using AWS services. It is secure and no amount will be charged within your free-trial process.
- The next step is to choose the support plan that suits your business requirements. Amazon AWS offers the following plans –
Plan |
Charges |
| Basic | Free |
| Developer | $49/month |
| Business | Starting $100/month |
| Enterprise Support | Custom |
b) Once your account is registered and confirmed, go to AWS Management Console. After you click it, you’ll be navigated to the AWS services dashboard.
-
-
- Select Storage and Delivery > CloudFront.
- Click on Create Distribution. You’ll see the following window appear. Select Web and Click on Continue.
-

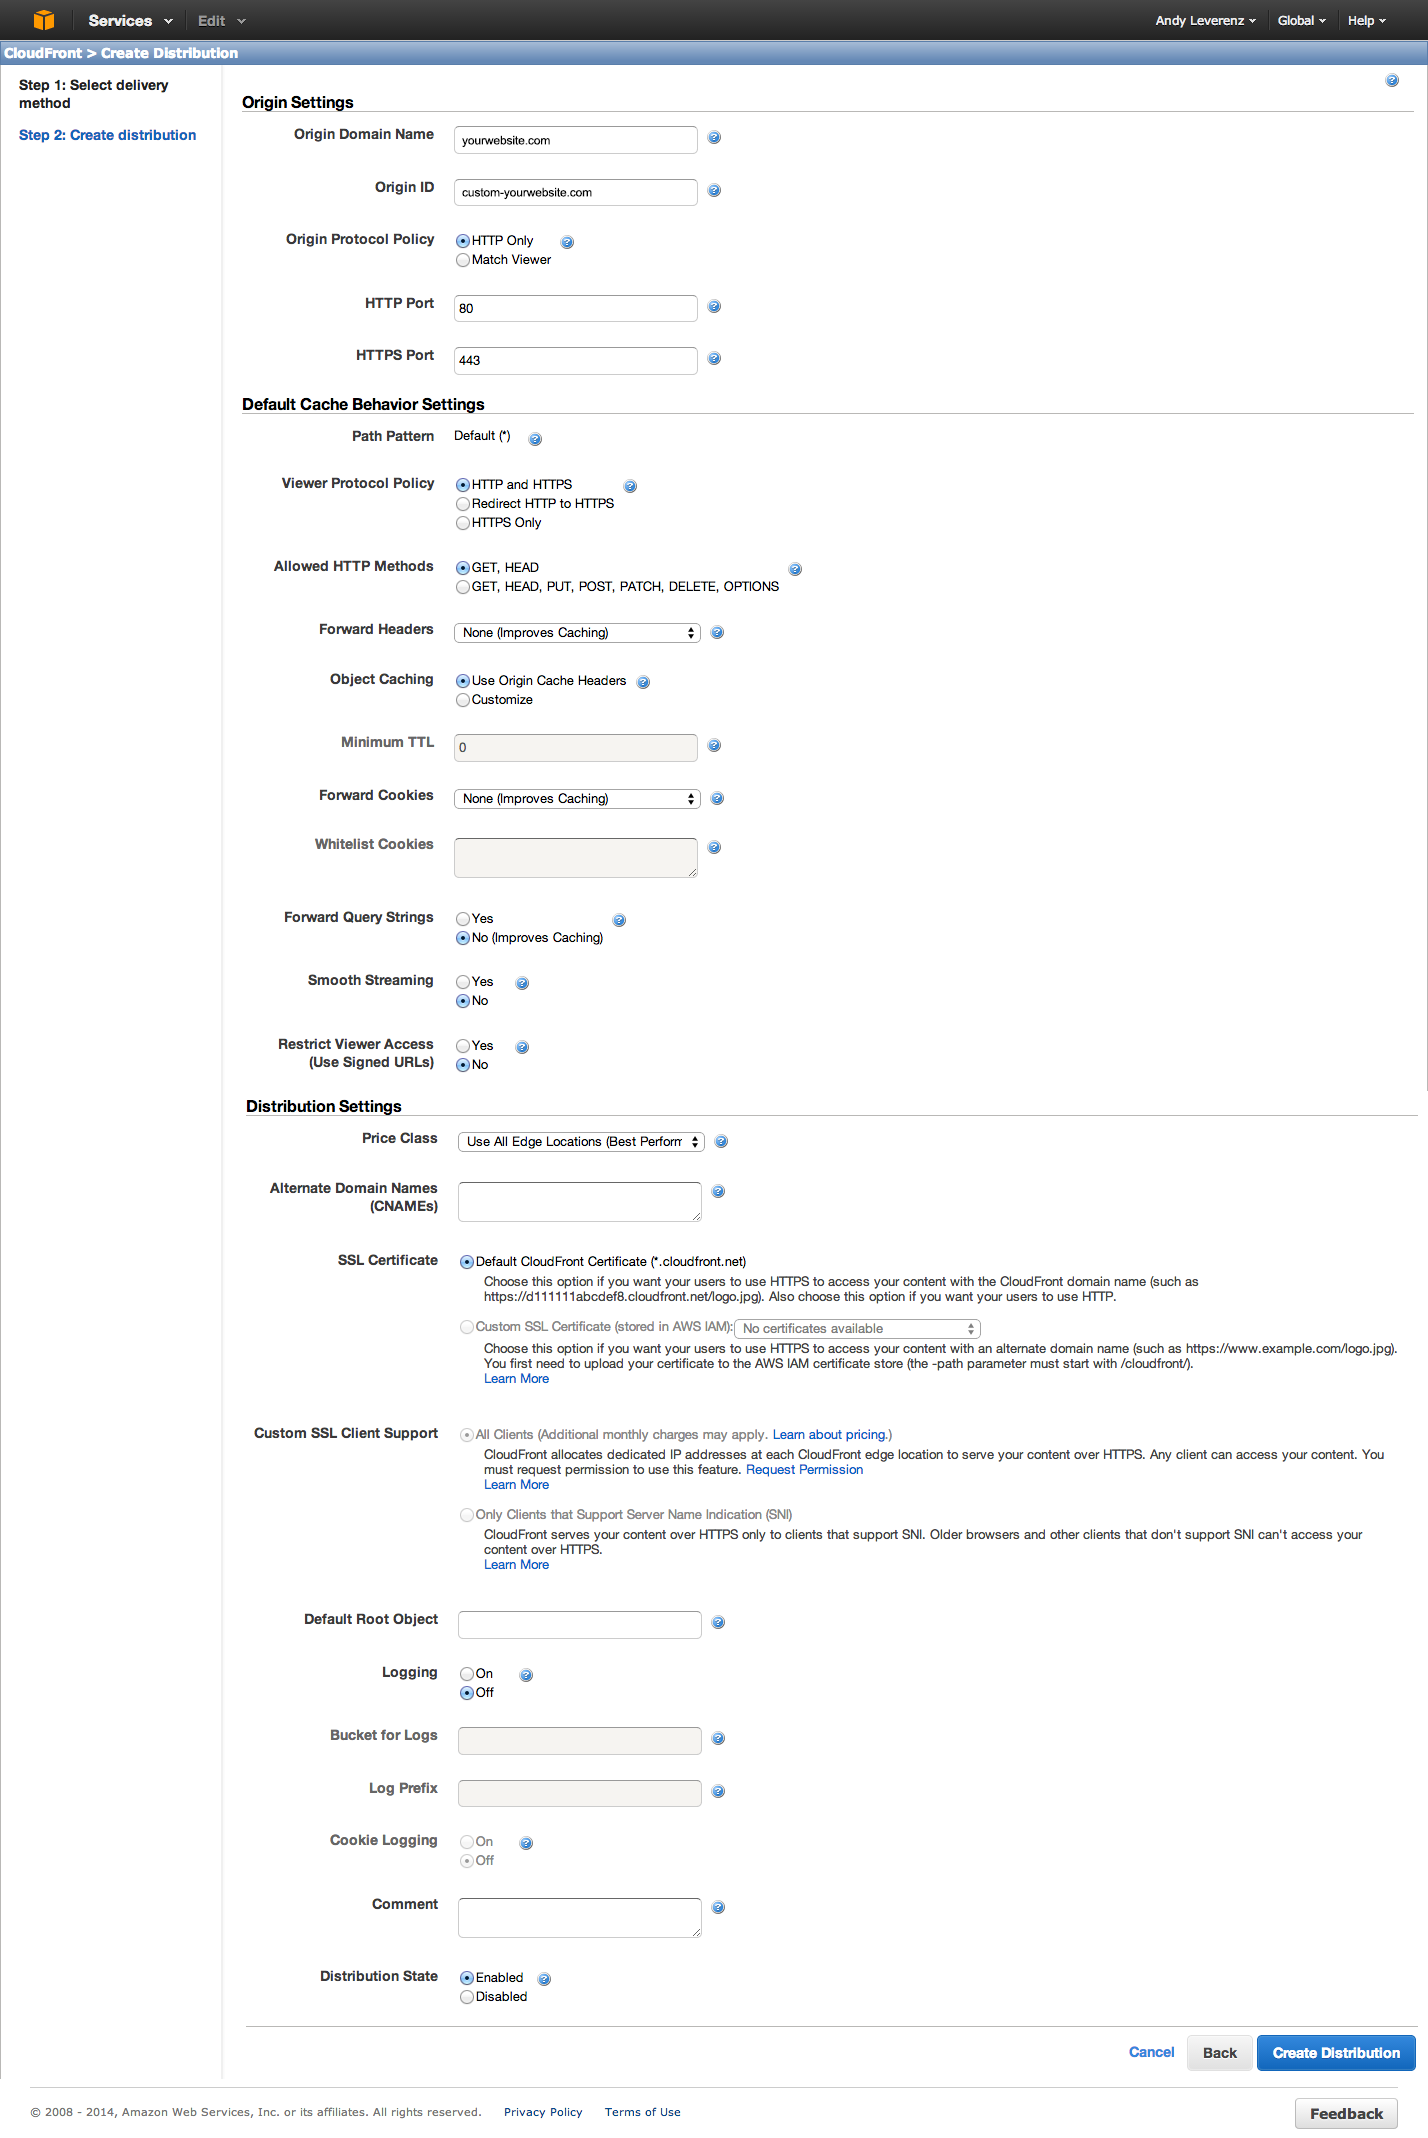
c) Next, you’ll be navigated to create a distribution. Add your website’s URL and origin id in the form that appears and select all the required settings to configure the CDN distribution settings. Once done, click on Create Distribution.
d) Once the distribution is created, the AWS page will navigate you back to the distributions dashboard. Here you’ll find the newly created distribution with all the related information like status, etc.
At this stage, the status of the distribution will be marked as “In Progress”. AWS indexes the provided URL and finds the static files and data from your website to mirror them and save them on its server. Once the CDN mirrors all the files from the origin server, its status changes to “Deployed”.
e) When the CDN is deployed, you can access the content in either way –
-
-
- The original way:http://mywebsite.com/wp-content/uploads/post-image.png
- The new way: http://1x1x1x1x.yourcdn.com/wp-content/uploads/post-image.png
-
2. Integrating CDN With WordPress
To enjoy the benefits of the newly deployed CDN, you need to modify your WordPress website’s built-in permalink so that it serves the requests from the CDN servers rather than the web host. To do so, you need to update the functions and filters in the functions.php file.
1. wp-uploads folder
This folder holds every media file that is uploaded on the WordPress website including images, videos, etc. To move them to CDN servers, add the function below within PHP tags in the functions.php file.
function cdn_url() {return ‘http://1x1x.yourcdn.com/wp-content/uploads’;
}
add_filter( ‘pre_option_upload_url_path’, ‘cdn_url’ );
After you implement the above function, check the URL of the uploaded media file within the HTML code. You may see your new URL to be somewhat like this –
<img width=”835″ height=”475″ src=”http://1x1x1x1x.yourcdn.com/blog/wp-content/uploads/2014/06/imagename.jpg” class=”attachment-post-thumbnail wp-post-image” alt=”image alt tag”>
If you’re getting a similar URL, this means that your image is coming from the CDN distribution and hence you may also witness a faster loading speed.
2. Stylesheets And Scripts
Implementing the above code, your media files are now mirrored with CDN. To ensure smooth functionality, you must also link your rest over static files with the CDN.
To load the stylesheets from the CDN, add the following scripts to your functions.php file. Adding the following snippet will rewrite your links to the assets on the website.
function enqueue_my_styles() {wp_register_style(‘my-styles’,’http://1x1x1x1x.yourcdn.com/blog/wp-content/themes/yourtheme/style.css’);
wp_enqueue_style(‘my-styles’);
}
add_action(‘wp_enqueue_scripts’, ‘enqueue_my_styles’);
Similarly to load Javascript from the CDN, follow the code snippet below-
function enqueue_my_scripts() {
wp_register_script(‘my-scripts’, ‘http://1x1x1x1x.yourcdn.com/blog/wp-content/themes/yourtheme/scripts.js’);
wp_enqueue_script(‘my-scripts’);
}
add_action(‘wp_enqueue_scripts’,’enqueue_my_scripts’);
Both the steps combined have successfully implemented the WordPress CDN for your website.
As discussed earlier, you may also do it with the help of a third-party plugin rather than doing everything manually over the WordPress end.
Popular CDN Providers In The Market
The marketplace is full of multiple CDN vendors offering CDNs with different custom features. To try it out as a beginner, we recommend you opt for the CDN provider with free trials.
Here are some of the most-preferred CDN providers listed that you must check out:
Summing Up!
A WordPress CDN is loaded with amazing benefits from minimizing TTFB to decreased bandwidth costs. Also, the faster loading speed and reduced server strains build up to better SEO rankings and improved user experiences.
We hope you enjoyed reading this heavy piece of information and it may have helped you beyond your expectations. In case you feel we’ve missed out on any crucial information, drop your concerns below in the comment section and/or share your views regarding the same.