

Do you think you can set up your WooCommerce store like a pro? After reading this article, yes.
Expanding your retail store by starting an online store is probably the most acceptable decision you will make for yourself in terms of revenue escalation. With the advent of the digital world, to stay ahead of your competitors, you must explore eCommerce’s benefits.
FYI, many popular eCommerce platforms allow you to create your online store. Naming a few popular ones, Shopify, WooCommerce, BigCommerce, etc. To clarify, an eCommerce platform is a software/plugin that allows you to construct an online store. Additionally, it enables you to handle commercial functions such as marketing, product sales, sales management, and customer service.
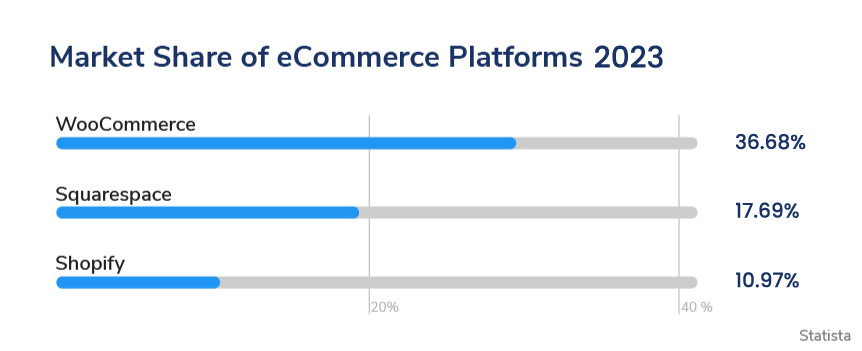
However, WooCommerce holds the highest market share at 36.68%. Setting up an online store might sound a bit overwhelming at first because of all its associated terms. That is to say, WooCommerce, payment gateways, plugins, integrations, configuration, web hosting, multi-store setup, themes, and the list is never-ending.
Why Is WooCommerce Best for Online Stores?
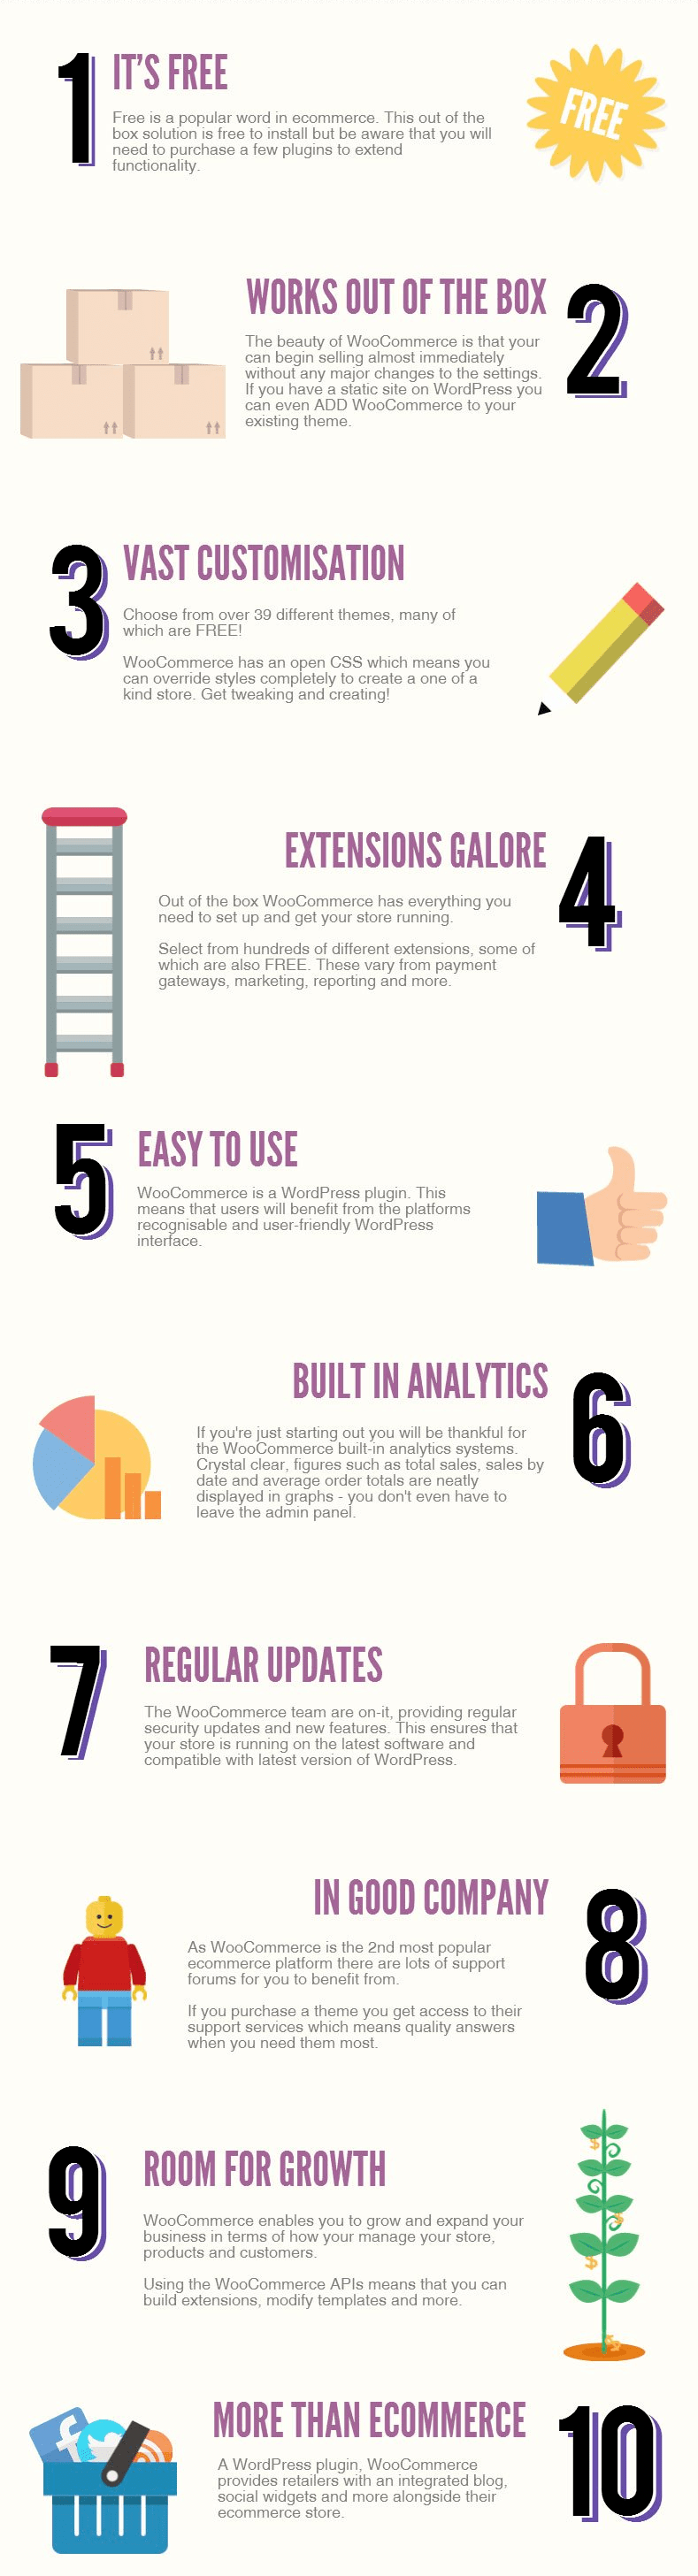
Not every eCommerce platform shall be a fit for your online business. That is to say, select one based on your business needs. On the other hand, opting for WooCommerce, the most popular eCommerce software among all solutions available online, offers you the following benefits:
- Firstly, WooCommerce is free, open-source, highly customizable, and provides full authority to store owners.
- Secondly, there are hundreds of the highest-rated WordPress plugins and a choice of many free & premium themes that enhance your WooCommerce store.
- Lastly, with safe and flexible payment integrations, you can sell any product, or subscription service, or collect funds for a non-profit organization with security.
In this post, I’ll give a WooCommerce WordPress tutorial for beginners to advanced users. We’ll go through every element of setting up a WooCommerce store.
Stay Tuned for more…
How to Setup Your Online Store With WooCommerce?
So, let’s start building your online store step-by-step using WooCommerce!
Table of Contents
- Pick Your Niche
- Purchase A Domain Name & SSL Certificate
- Purchase a Hosting Plan
- Setup WordPress And WooCommerce
- Choose WooCommerce Theme
- Choose The Right Plugins For Your Store
- Start Adding Products To Your Store
- Choose The Right Payment Gateway
- Choose The Right Shipping Platform
- Promote & Market Your Online Store
STEP 1: Pick Your Niche
Before setting up your WooCommerce store, you need to finalize your eCommerce niche. It defines what your brand specializes in and stands for. There are so many popular WooCommerce stores that follow a particular industry and specialize in their niche.
For example, Mcdonald’s sells burgers & fries, KFC is famous for chicken wings, Ceat sells tires, Apple is a technology brand, etc. These brands have a defined niche, and they work to excel in that.
Narrowing down your niche would help you a lot to understand your goal and bring better customer satisfaction and feedback. Additionally, this also helps you to segment your target customers.
How to Choose a Niche for Your Online Store?
Let’s now take this WordPress WooCommerce guide to its next section.
STEP 2: Purchase a Domain Name & SSL Certificate for Your eCommerce Store
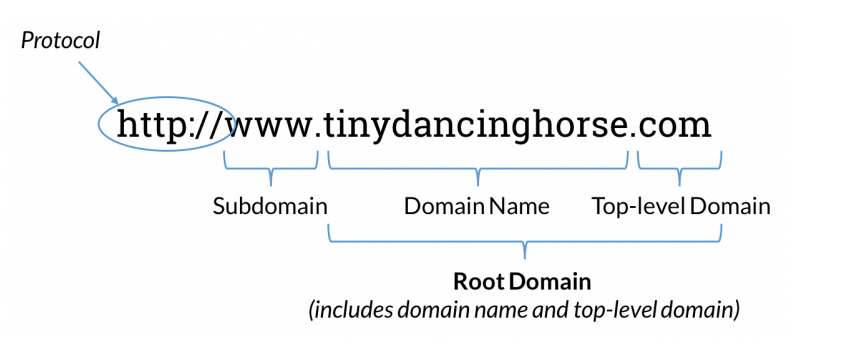
What Is a Domain Name?
The name that displays on your website URL is your eCommerce store’s domain name. It is the real identity of your online business. Your customers use this name to reach and request your services.
Now the first question arrives… How to choose the best domain name for your WooCommerce store?
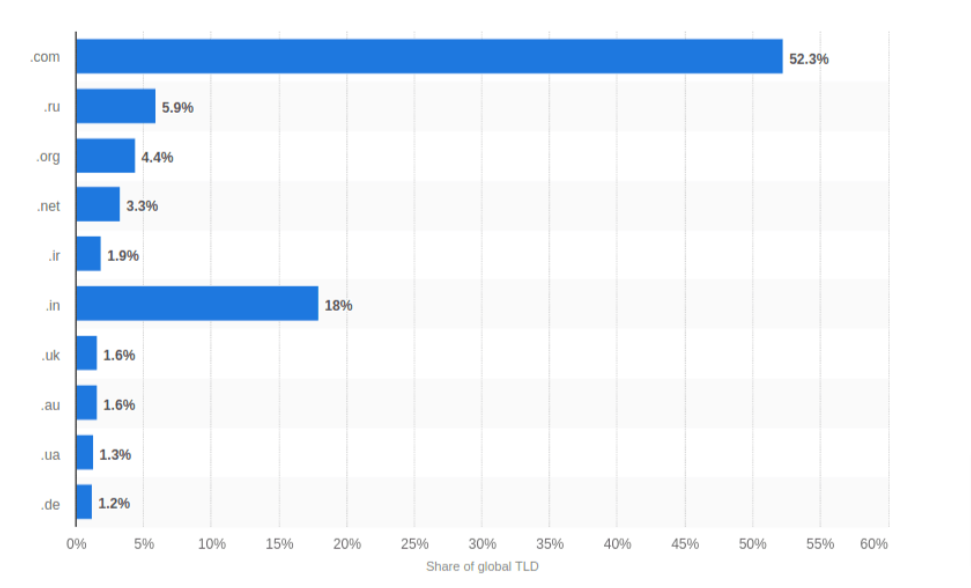
Select the Right Domain Name Extension
There are more than 280 different domain names ending except for .com, .net, .edu, and .org. The most popular domain name extensions of all time are .com, .org, and .co, but the list is not over yet there are many others. Select the right domain name extension according to your WooCommerce brand!
Represent the Goal of Your Brand
Your domain name is your brand identity. Consider your objectives and then brainstorm the words that can best describe your brand. Your brand name should be the same as your domain name (URL).
Create a Memorable Domain Name With an Acceptable Length
Try to create simple, clear domain names that help to create ease for your users. Difficulty in domain names eventually creates a gap between you and your consumers.
Additionally, the ideal character length for domain names is 6-14. Your website domain length shouldn’t be too small or too long. A domain name with an exact word length is perfect!
Include SEO Keywords
You can also leverage SEO keywords while creating your domain name. It will help you get recognized by making your presence in search results. There are also plenty of platforms that show the SEO-Friendliness of your domain name like GoDaddy.
Do You Know How to Make WooCommerce SEO Friendly?
It Needs to Be Unique, Trending & Real, and Follow Domain Policies
Your domain name should be new and follow all the terms and policies required for creating a domain name. Also, check its availability on social networking sites.
Your domain name should be:
- Unique
- Include trending words
- Creative
Your domain name shouldn’t include:
- Confusing Domain Name
Some More Suggestions for Domain Name Registration
- Firstly, avoid the use of consecutive hyphens but you can’t start or end your domain name with a hyphen
- Secondly, domain names are free from case sensitivity
- Thirdly, rules and regulations are county-specific
- Finally, it shouldn’t exceed your budget line
You can generate your domain name using Google Domains, GoDaddy, Namecheap, or Bluehost. These tools are easy to use and assist you to find the best name for your business.
SSL Certificate
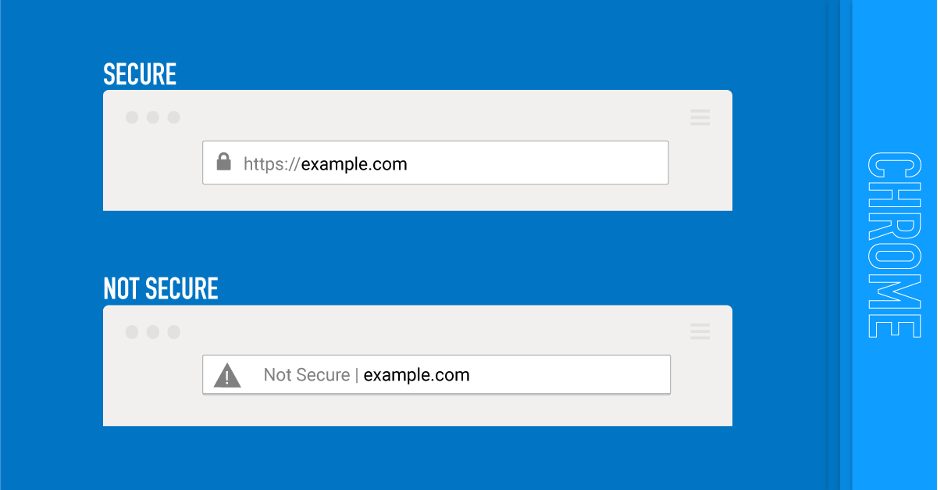
Purchase an SSL certificate to protect the sensitive data of your website from unauthorized users. In more simple words, an SSL certificate adds an extra ‘s’ to your website URL i.e. HTTPS.
You can not only encrypt your data from unwanted users but can also create your presence in the search results – as Google prefers to rank the websites that have an SSL certificate otherwise represent them as Not Secure.
Furthermore, online consumers favor websites that have HTTPS in their URL for their online activities like shopping, reading, and watching.
You can purchase your SSL certificate from Domain.com or choose to go free using platforms like Bluehost, Dreamhost, HostGator, and WP Engine. By using these platforms, you can save money that can be utilized in purchasing other useful WooCommerce extensions.
STEP 3: Purchase a Hosting Plan
WooCommerce is a WordPress plugin that means you need to create a hosting account where you can save all your website files. While purchasing a hosting plan you need to consider factors like uptime, speed, customer support, security, and your business size.
There are hosting companies like WP Engine, Bluehost, Kinsta, Hostgator, DreamHost, and InMotion.
WP Engine Hosting
WP Engine hosting plans start from $25/month to $292/month. Choose the hosting company that can help you fulfill your needs, provide effortless site management, and excellent customer support & security.
If you are on WooCommerce, enjoy Woo-optimized infrastructure, push-button ElasticPress, easy eCommerce site building tools, and automated plugin updates with visual regression testing to help keep your store secure with WP Engine. Highly recommended.
To know more about WordPress Hosting…
STEP 4: Setup Your WooCommerce Store With WordPress
How to build a WordPress eCommerce website? After knowing all the things required to set up an online store with WooCommerce, it’s time to explore all the steps through which you can install WordPress and WooCommerce. So, let’s start exploring all the steps.
Install WordPress
Installing WordPress isn’t a tough job. You can have your WordPress site in five minutes if you proceed with the right procedure. You can either install WordPress manually or automatically through your hosting account- as nowadays, many hosting providers allow you to leverage one-click installation.
Using WooCommerce with WordPress is really simple. But first, you need to decide whether you want to install WordPress manually or leverage the one-click functionality.
If you want to install WordPress all by yourself, then:
- Download and extract your zip file.
- Create your WordPress database and username for the same
- Rename your existing file with wp-config.php (*Optional- you can skip this step if you want to do so)
- Upload your WordPress file
- Now run the installation script in a browser
However, if you don’t want to go through the lengthy manual process of installing WordPress for setting up your WooCommerce store, you can install WordPress with one click through your web hosting providers.
Install WooCommerce
After you install WordPress, proceed to WooCommerce. You can install WooCommerce – the best-hosted eCommerce solution in three ways:
- Create an account on WooCommerce.com
- Download the WooCommerce plugin from wordpress.org
- Type WooCommerce in the search bar inside your WordPress site
For the 1st Approach Follow the Listed Steps:
- Log in to your WordPress Account
- Leverage one-click install using Bluehost (or any that provides one-click install)
- Download the zip file of the plugin.
- Install & Activate
For the 2nd & 3rd Approaches Follow These Steps:
- Download the plugin for free from wordpress.org
- Log in to your WordPress website
- From Dashboard go to Plugins > Add New
- Upload your plugin – WooCommerce (or use the search bar and type WooCommerce)
- Click on the Install > Activate button
- Access WooCommerce Setup Wizard (after clicking on the Activate button, you’ll be redirected to the setup wizard)
WooCommerce Setup Wizard
Using the WooCommerce setup wizard, you can personalize your eCommerce store to provide a better user experience. The moment you complete the installation process, you’ll be redirected to access the WooCommerce setup wizard. The setup wizard is like your personal assistant that helps you set up your WooCommerce store.
You can choose to either complete the wizard steps or skip them by clicking on the “Not Right Now” button. But I would highly recommend completing the wizard setup process as it brings more flexibility and makes your store ready to sell. So, let’s proceed with the steps involved in setting up your wizard.
You don’t need to worry. You can change your details anytime you want in the WooCommerce Setting.
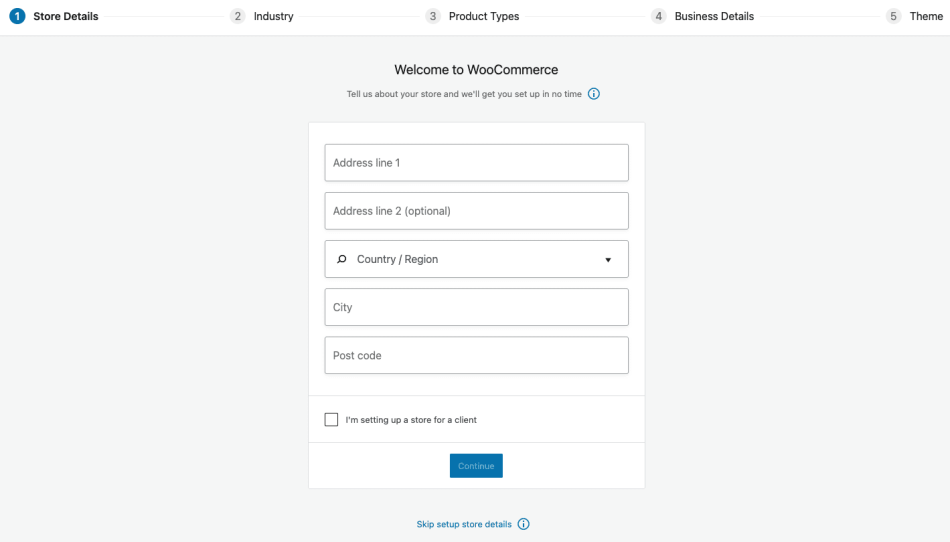
Setup WooCommerce Store
How to set up a WooCommerce store?
- Select your store location from the drop-down.
- Enter your complete (authentic) store address [street address]
- Fill address line 2 [apartment, suite, or any other address]
- Enter your City and Postcode
- Enter the currency you want to accept using the drop-down
- Select the type of products you want to sell (Physical, Digital, or Both)
- Cross-check the checkbox if you want to sell products/services in person.
- Now click on the Let’s Go! button.
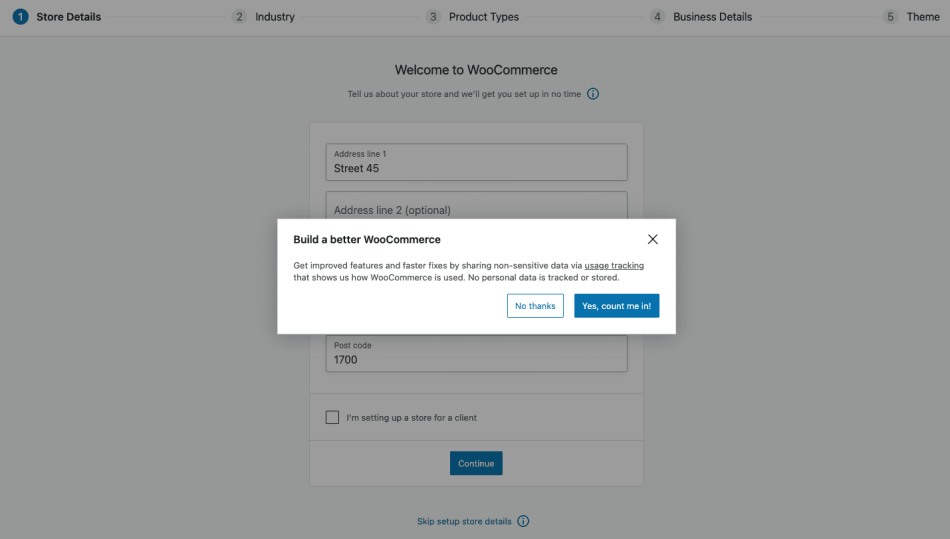
After clicking on the button a pop-up appears asking you to enable usage tracking to help WooCommerce improve its performance. Within the pop-up, there are several options present to help you understand what is usage tracking and how you can help WooCommerce to improve!
WooCommerce Payment Gateway
WooCommerce accepts both online and offline payments. Depending on your requirements, you can also add more payment extensions (both free/paid) later on. In the first step, if you haven’t cross-checked the box with content – sell products/services in person – then you’ll get payment options from Stripe and PayPal.
But if you have cross-checked the box, you’ll get more payment options along with Stripe and PayPal.
Note– The payment options represented here also depend on your business location. For example, if your business location is in South Africa, you’ll also get the payment options like PayFast to select from the rest. All the extensions proposed here are free and have auto-install functionality. After you set up your WooCommerce store, you will need more payment options.
WooCommerce Shipping
In this step, you can grant the wizard to print shipping labels at home but this option is available to business locations present in the US and Canada. You can also select your product weights and dimensions.
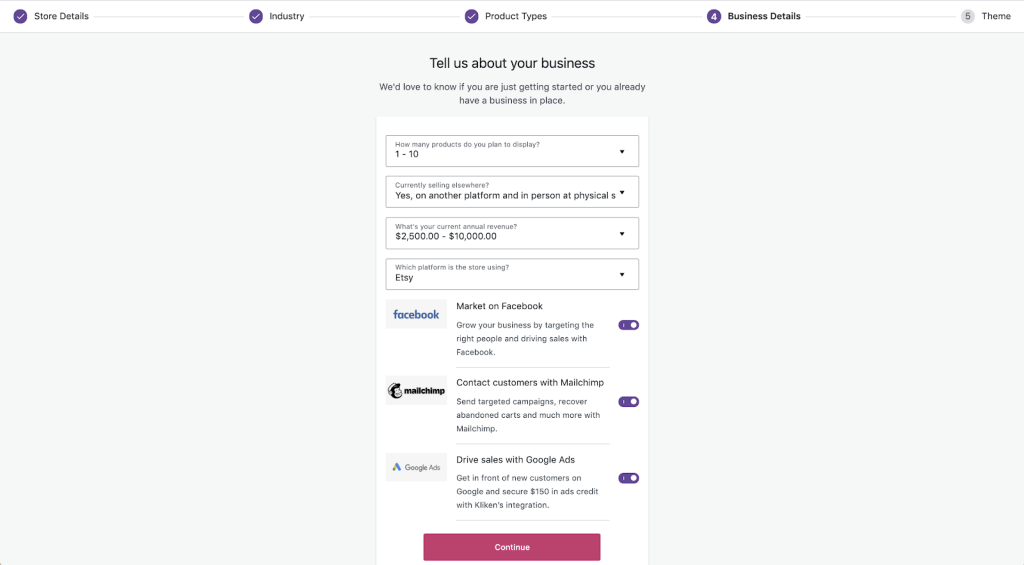
Tools Recommended
Here, WooCommerce recommends tools like Facebook, StoreFront, MailChimp, and more for enhancing your store performance. None of them is required (necessary) to set up your online store, but still, you can select the one you want to use for your business. You can uninstall these extensions later on when you don’t feel their need and find them inappropriate for your business.
Note: WooCommerce setup wizard shows extensions depending on your business location.
Connect Your Store to JetPack
JetPack is a WordPress plugin that consists of the utmost features of WordPress in one plugin. You can select and manage the features you want to use for your store. But WooCommerce wizard brings this step as an optional one. So, you can decide whether you want to use JetPack for your business or skip it. Take some time and then only click on any of the available options.
WooCommerce Store Is Ready!
You’ve configured your WooCommerce wizard. Now you can add/import products to start selling and earning. Additionally, subscribing to the WooCommerce newsletter brings practical tips/tricks and new/updated extensions to help WooCommerce store owners expand their businesses. Moreover, navigate to your WooCommerce Dashboard, and Review Setting to view and customize the wizard you just configured anytime.
You can change any of the WooCommerce wizard settings by visiting WooCommerce Dashboard > Products > Setup Wizard.
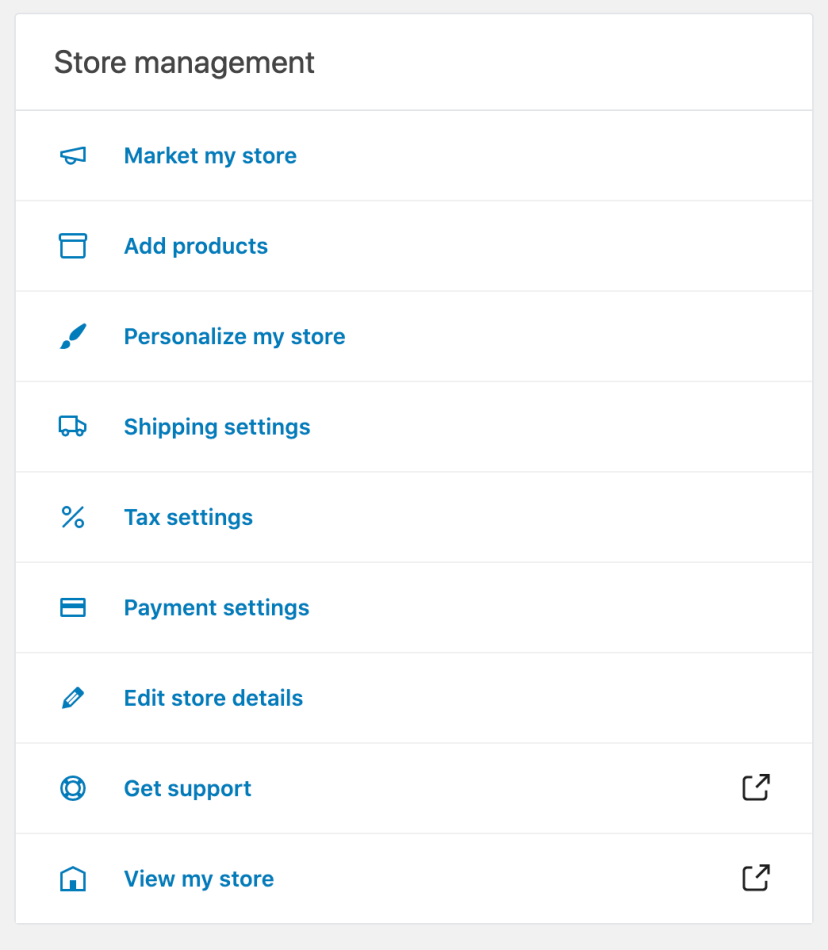
After completing your store setup, the WooCommerce setup wizard will be replaced by Store Management Wizard.
STEP 5: Choose a WooCommerce Theme
To add colors and design to your website there is a wide variety of free and paid themes. Depending on your business, you can choose whether you want to install a premium or free theme.
If there are themes that provide exceptional functionalities, design, and support then there are also themes that consist of malicious codes. So, it would be good if you check and cross-check the theme you’re planning to purchase.
Still, Confused About Selecting Themes for Your WooCommerce Store?
STEP 6: Choose the Right Plugins After Set-up of Your WooCommerce Store
After you set up your WooCommerce store, the fun part is that you can add more functionalities and make your website more flexible by purchasing wooCommerce extensions. There are numerous marketing and store management extensions. You can easily find the extension you want for your store.
You might get fascinated by the fantastic features and functionalities of different extensions. But I would recommend you avoid purchasing too many extensions as it can slow down your website performance. Just get your perfect WooCommerce plugins.
Choose the WooCommerce extension that comes under your budget and feel the need for the same.
Moreover, it’s your first eCommerce store. It will help if you keep your investment as minimal as possible. Once your online store starts producing revenue, you can purchase the remaining extensions to enhance your store performance. But in the beginning, don’t purchase extensions only because they’re listed or recommended by someone as it can affect your budget.
Here is the list of WooCommerce extensions you can consider as a beginner. You might directly download these useful:
WooCommerce Extensions |
Purpose |
Price |
| Points and Rewards For WooCommerce | Create Loyalty Programs And Reward Customers for Purchases And Referrals. | $0 |
| Gift Card for WooCommerce | Sell Digital Gift Cards in Your Store And Increase Customer Engagement. | – |
| Wallet System for WooCommerce | Digital wallet plugin allowing customers to purchase WooCommerce products with digital currency amounts. | – |
| Subscriptions for WooCommerce | Cover recurring revenue from your WooCommerce store. | – |
| Mautic For WooCommerce | Enhances Your Email Marketing Efforts With Marketing Automation | – |
| Google Analytics | Allows You To Track Your Store Activities With Numbers & Graphs | – |
| HubSpot for WooCommerce | Integrate Your WooCommerce Store With HubSpot To Sync Your Data Over To Such a Powerful CRM | – |
| iThemes Security | Protect Your eCommerce Store From Hackers. | – |
| Contact Form 7 | Create Forms Through Simple Shortcodes That You Just Need To Paste On Your Website Pages. | – |
Some More WooCommerce Extensions
WooCommerce Extensions |
Purpose |
Price |
| WP All Import | Export Products to your WooCommerce store via any file(XML, CSV, or Excel) including very large files, images, etc. Now easily import bulk data with flexible API and a simple interface. | From $149 |
| Yoast SEO | A WordPress Plugin That Allows You To Increase Your Ranking On SERPs. | $0-$89 |
| Coupon Referral Program | Provides An Ability To Create A Referral Marketing System & Encourage Customers To Referrer More Friends Using Coupons/Points. | $49 |
| WooCommerce RMA for Return Refund & Exchange | Provides An Easy Refund, Exchange & Cancel Order Request Interface for The Purchased Product to Customers Or Guest Users. | $69 |
| Save Cart Later | A Cart Optimizer Tool That Reduces Cart Abandonment Rate Of Online Stores By Providing The Option To Save Cart Products For Future Purchases. | $49 |
STEP 7: Start Adding Products to Your WooCommerce Store
If you have selected the products you want to sell to your customers, check out the steps that show how you can add your products. But first, how many products can WooCommerce handle? The sky’s the limit. WooCommerce is highly scalable and can manage a vast inventory. So, no worries on that part.
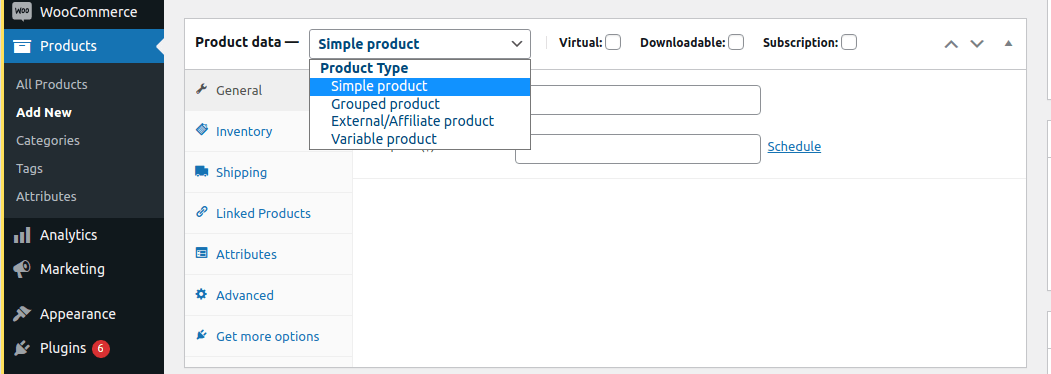
Are you thinking, “What type of products can I add to my WooCommerce store?” To explain, by default, WooCommerce has six types of products:
- Simple Products
- Virtual Products
- Grouped Product
- Downloadable Products
- Grouped Products
- External Products
- Variable Products
WooCommerce also supports custom product types. You can add unique product types like auctions, subscriptions, and bookable products using WooCommerce extensions and other compatible plugins.
How to Add Simple Products After You Set Up Your WooCommerce Store?
- Go to your WooCommerce Dashboard > Products > Add New
- Enter the Product Title and Detailed Description
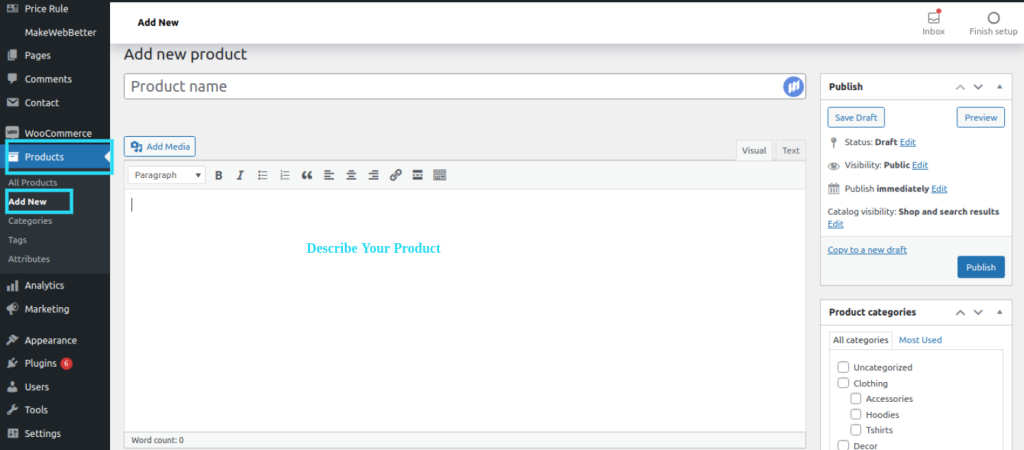
- Scroll down and click on the Product Data button
- Select Simple Products from the drop-down menu present across Product Data
- Now Select downloadable if digital and virtual if service [Note- if you sell virtual products then you can’t apply shipping cost]
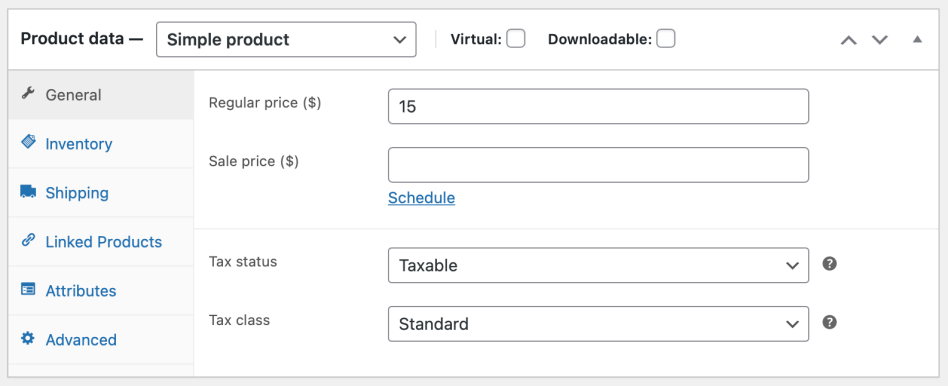
- From Product Data Meta Box Go to General Tab
a) Set Regular and Sales Prices
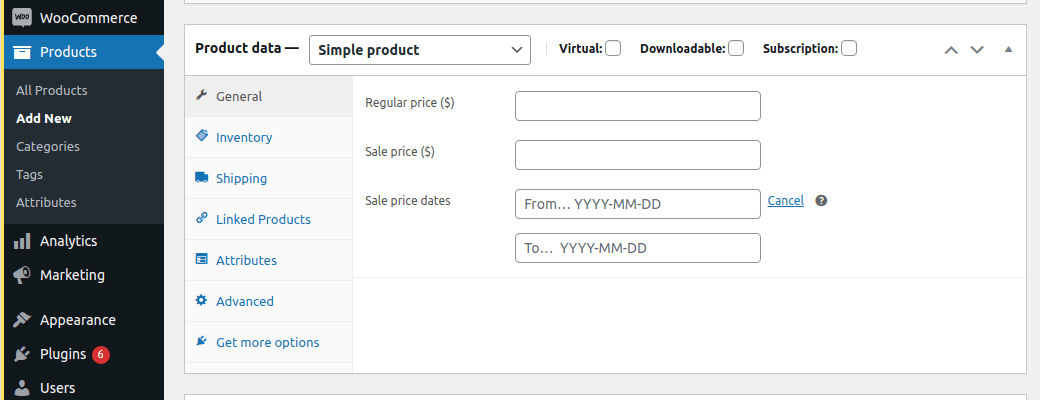
b) Select Tax Status from the drop-down menu [i.e. select either- Taxable, Shipping Only, None]
c) Define Tax Class (use the default or the additional tax class created by you)
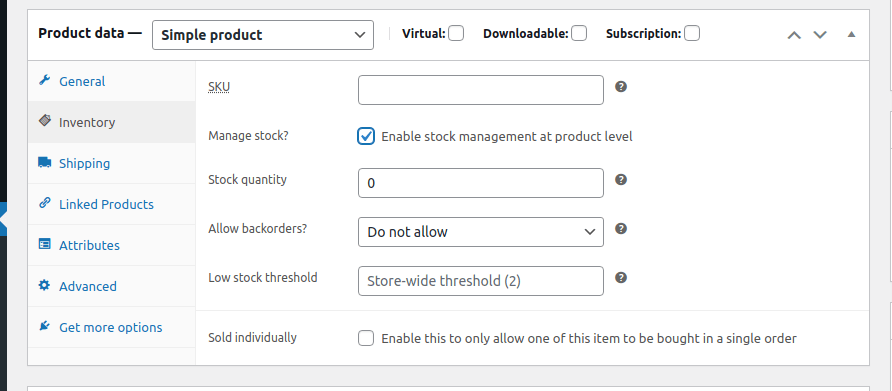
Go to the Inventory Tab
- Enable stock management at the product level
- Enter Stock Quantity [WooCommerce auto-manages your product stocks i.e. Out of Stock or Backorders are on auto-update]
- Select whether you want to allow Backorders or reject
- Enter Low Threshold value
- Cross-check the checkbox Sold Individually if you don’t want more than one item to be bought in the same order
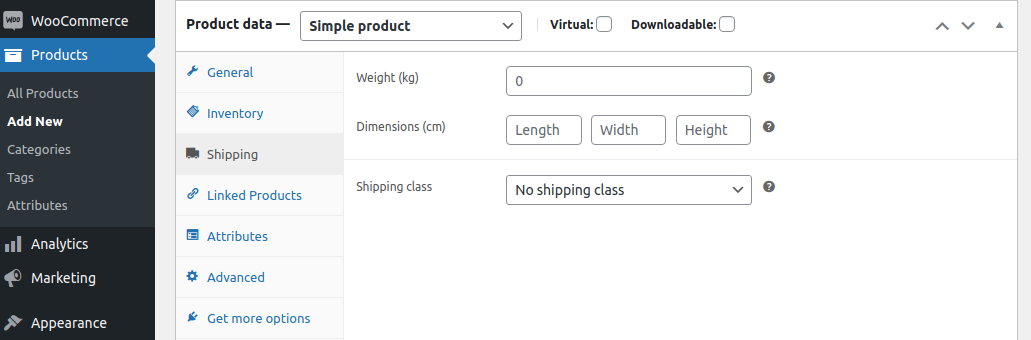
Go to the Shipping Tab
- Enter the weight and dimension of the product
- Select Shipping Class from the drop-down
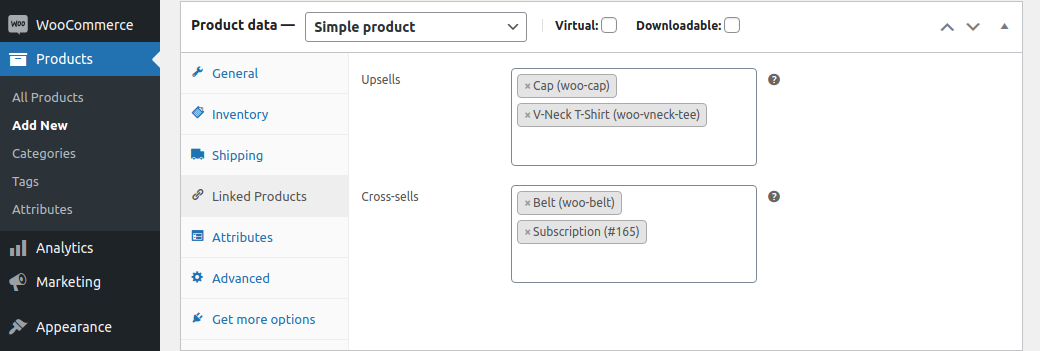
Click Linked Products Tab
- Enter your products for upselling and cross-selling
- Choose the product for grouping
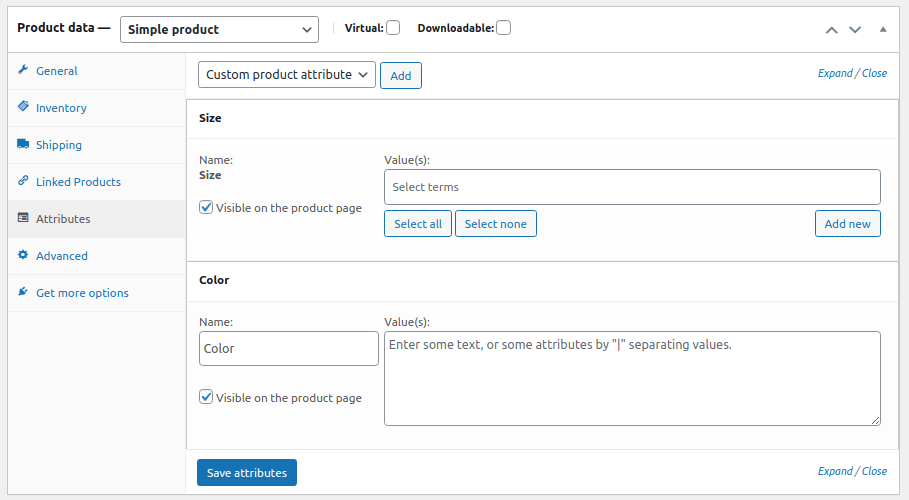
Go to Attribute Tab and provide detail of your product. You can create as many WooCommerce product attributes as you want.
Go to Advanced Tab
- Enter the Purchase Note that customers will receive after completing their purchase
- Set Menu Order, i.e the position of the item on the list of WooCommerce products
- Allow/disallow Reviews for the same product

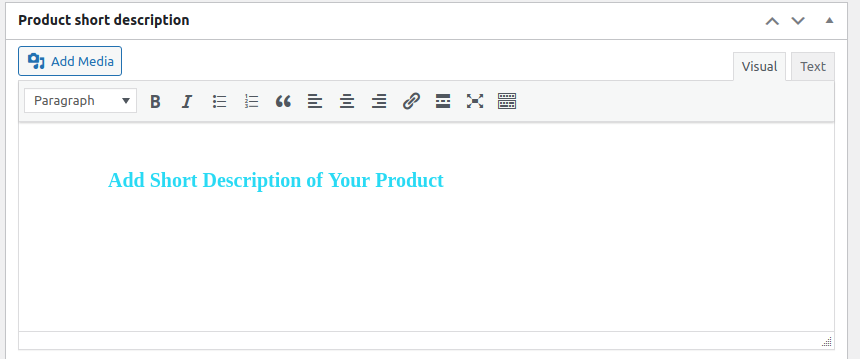
Now prepare a short WooCommerce product description and paste it into an excerpt [this content piece appears next to the image and is termed as a short product description – the long product description appears on the dedicated product page]
Assign product categories and tags to your product in the right sidebar. It makes the navigation of products easier for your customers.
Add Images and Create Gallery
- In the publish section [present in the right sidebar] set catalog visibility [Shop and search, Shop Only, Search Only, Hidden]
- Tick to make it your featured product

Add product filters to your store for better management of your WooCommerce inventory.
How to Add a Grouped Product in WooCommerce?
To form group products you need to combine child products and follow the sequence given below.
- Select Grouped Products from the drop-down menu present across Product Data
- Create grouped products
- Go to your WooCommerce Dashboard > Products > Add Product
- Enter the Product Title of grouped products
- Scroll down and click on Grouped from the drop-down
- Click on Publish
- Add products
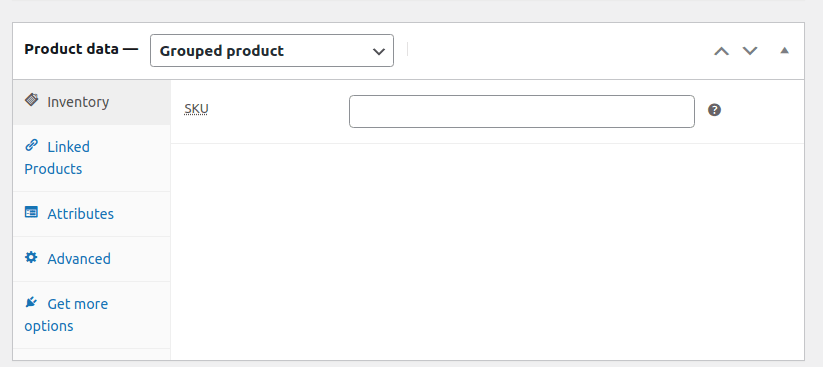
- Go to your WooCommerce Dashboard > Products > Add Product
- Select Grouped product
- Go to Product Data > Linked Products
- Choose Grouped Products and type the product name
- Add products
- Click on the update button
STEP 8: Choose the Right Payment Gateway
As a WooCommerce store owner, you can provide your customers with the payment options they want for their shopping. Setting up a WooCommerce store for payments is essential for an eCommerce business.
So, if one of your customers prefers to use PayPal, everyone doesn’t need to use the same payment option… However, going for a safer option wins over the user’s trust, so better keep some best WooCommerce payment gateways.
In a world full of fraud, you need to secure your payment system through the right payment gateway!
Additionally, offering multiple payment options for customers to complete their shopping also reduces your cart abandonment rate.
On the WooCommerce marketplace, there are multiple payment extensions. Click to get the complete list. In this WooCommerce store setup guide, let’s now see – how you can select your online shipping carrier!
STEP 9: Choose the Right Shipping Platform
The ability to deliver the purchased product in the least possible time has increased online shopping frequency.
Nowadays, customers want their products as early as possible. And that’s why customers prefer to shop from websites that provide early shipping options.
If you want to come in good books for your customers, you need to provide them with the best shipping experience.
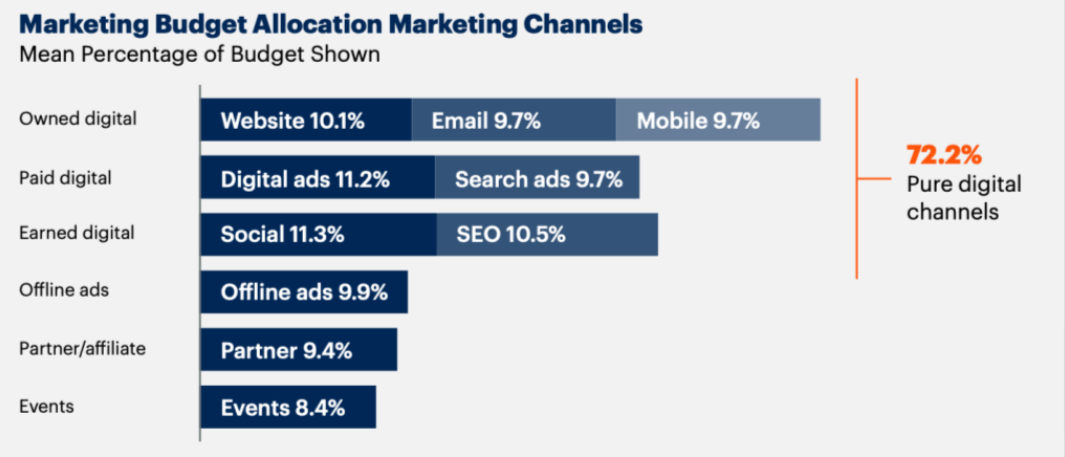
STEP 10. Promote & Market Your WooCommerce Store
We just finished the WooCommerce store setup. Now you can decide on the marketing platforms where you want to promote your business and the products you sell.
Depending on your budget, you can decide the platforms you want to use for marketing and promoting your business.
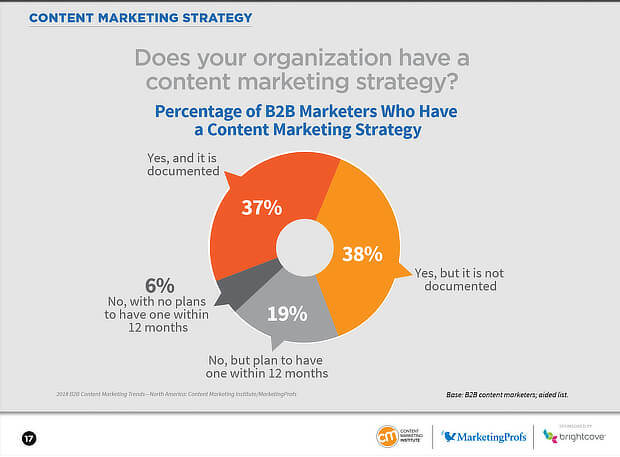
Content Marketing for Your WooCommerce Store
Content marketing is the foundation of any marketing campaign. It would be best to have content for everything, whether product descriptions, landing pages, social media, or emails. Regular blogging builds the ranking on the one hand and keeps the customers’ engaged on the other.
Variation in content types keeps your customers entertained. Being a WooCommerce store owner, you can take the content inspiration from the customer queries you face regularly and draft FAQs, knowledgebase, or other related content resources. Or you can create content for the target sales in a particular season, event, or trend.
Since visual content demand is increasing in the market, memes, infographics, videos, and GIFs are also considered ways to share social media content.
Visual Marketing Isn’t Just Effective – It’s REALLY Effective… Because Visual Marketing Enhances Your Brand Identity.
Email Marketing Is a Yes for Your WooCommerce Store
Sending emails regularly to the subscribers and potential audience is email marketing in its broadest sense. It is the oldest marketing method used by marketers to convert their potential leads.
In email marketing, you need to create a detailed workflow to define the flow of sending emails. You can use HubSpot for managing your email marketing campaigns effectively. Additionally, Mautic helps in the marketing automation of your eCommerce business.
It is also essential to plan the content and CTAs in the email first while designing the campaign and deciding the frequency of emails. So that it isn’t considered spam or reported and you can make a profit from your email efforts.
WooCommerce Social Media Marketing
Networking platforms let you spread your business boundaries and build strong relationships. Social media promotes branding, enhances customer loyalty programs, and most importantly helps to generate leads.
When starting with social media marketing, you should be clear about your social media objectives, i.e., what you want to do on social platforms, how you want to do it, and what results you expect in return.
You need to decide the platforms you want to use before you start posting, sharing, or commenting. If you succeed in selecting the niche platform, then you would be saving lots of money and time.
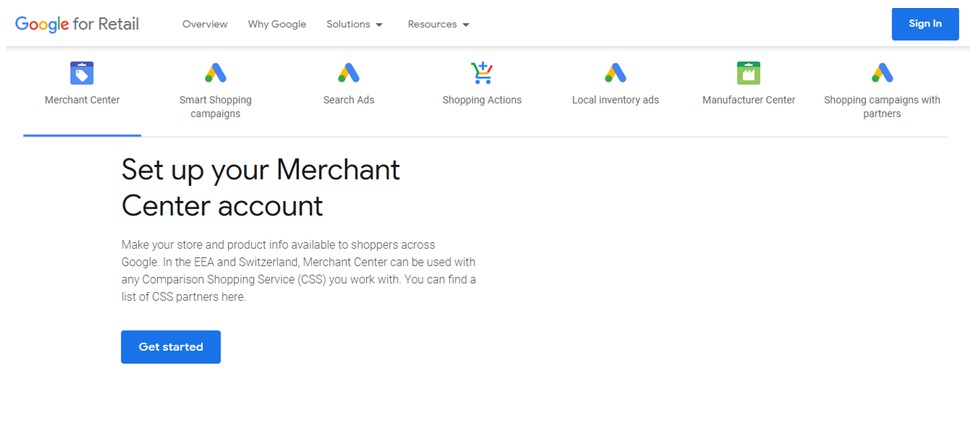
Improve Your WooCommerce Website SEO
After setting up your WooCommerce store, it should catch the eye of customers. To make your eCommerce store visible on Google pages, you need to perform SEO on your product and blog pages. Work on your website SEO to improve your organic traffic and consumer behavior. Additionally, it helps you improve the site’s performance. The Yoast SEO WordPress plugin includes everything you’ll need to keep track of your SEO.

Run Ads & Retarget Your Segmented Audience
Through digital advertising, you can make more profit in less time. For this, you need to go through advertising terms like pay-per-click, Facebook pixel, remarketing tags, and a lot more. By running ads you can segment your customers.
Use Analytics for Better WooCommerce Sale Results
Using analytics, you can detect all the loopholes and take appropriate actions that will help you meet your business target. You can also append your current service marketing strategies after analyzing your users’ behavior on your online shop.
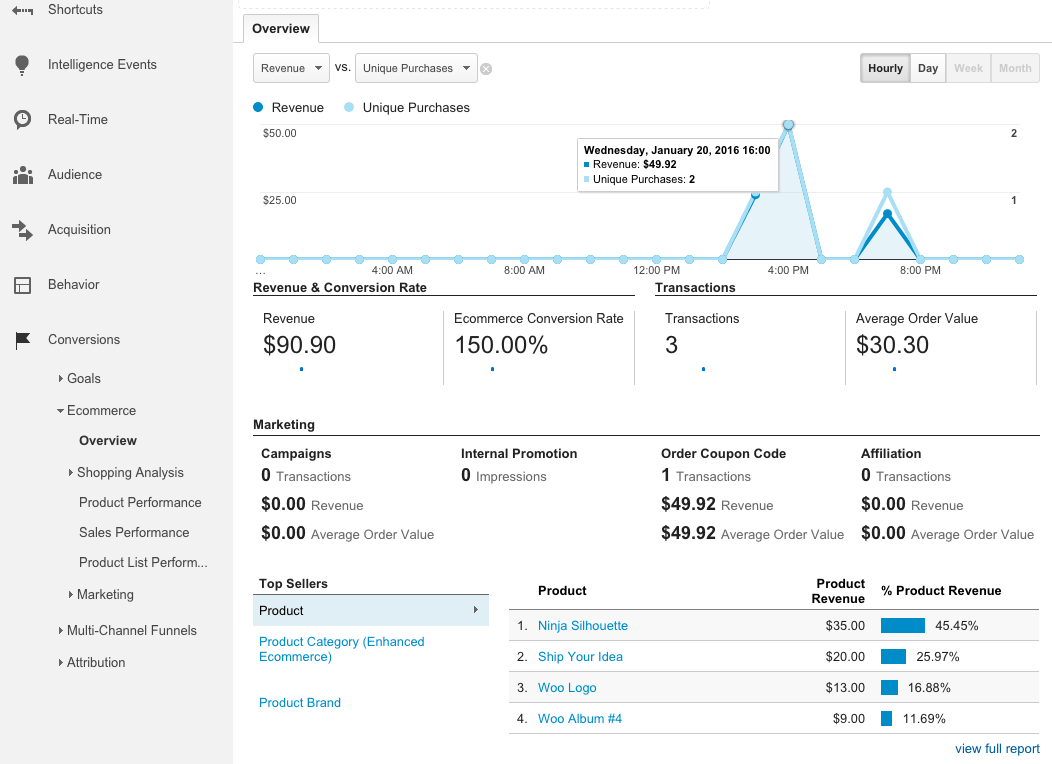
Analytics data also enables you to increase your revenue by detecting the stage where your maximum users abandon your site. In short, analytics will grant complete control over your site data and performance.
Takeaways
- Set up your WooCommerce store after determining your business objectives.
- Create a list of WooCommerce products/services you want to sell in your online store.
- Set Up a WooCommerce store that inspires you to push your limits for reaching better results.
- Use the term demographic information to understand more about your audience’s behavior towards your business.
- Check your competition before taking your step into the eCommerce market.
- Purchase a domain name, hosting plan, and an SSL certificate to set up your online store.
- Install WordPress and WooCommerce.
- Choose and install a WooCommerce theme keeping your store requirements.
- Select store enhancement and marketing extensions for providing a better user experience.
- Add the products/services you want to transport.
- Choose payment and shipping platforms.
- Market your just setup online store using the platforms in which you can invest your time and money.
- Start adding your visitors to your sales funnel.
Did We Just Set up Your WooCommerce Store?
Build a WooCommerce store to expand your business boundaries and acquire better results! Above all, I have tried to cover every aspect required while building an online store using the WooCommerce platform.
If you want me to include any specific topic or tool, then comment below. If we find it accurate for our post, we will indeed have it! And don’t forget to share your thoughts about this online store setup guide!
Additionally, we also provide WordPress/WooCommerce solutions to retailers of all sizes. If you need help setting up your online store using the WooCommerce platform, don’t hesitate to contact our Woo experts! Schedule a meeting with them to get all your answers.


I am searching on google how to setup Woocommerce on WordPress and I find your post. And after reading your content, hopefully, now we can setup Woocommerce on WordPress easily. Thank you!
Thank you Devid, I am glad you found it helpful. After you create your WooCommerce store, you might wanna get back to us to discover useful free plugins for your store.
All the best.
WOW!! Thank you very much.
It really helped me a lot !!
Adding an Audio file is an amazing idea!
I bookmarked this website this really is amazing ..
We use Amazon Polly so that our readers can do multiple things while listening to our posts. Thank you for liking our idea and this post! Always stay connected!